

I thought I would share the post I did on Johnny In A Dress last week in case you missed it!
Today I am going to show you how to make one of my favorite type of hair bows.
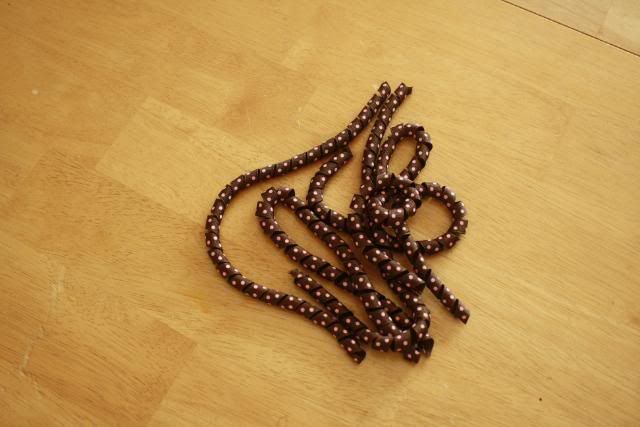
Korker Bows!
Korker bows are SO cute and I love how they are different from normal hair bows!
They are very boutique-y {yes I made that up} looking and surprisingly SIMPLE to make!
Today I am going to show you how to make your own! Are you excited? I am! Let's get to it!
Supplies Needed:
3/8 inch grosgrain ribbon
3/8 inch grosgrain ribbon
1/4 in wood dowels (can find them at any craft store)
little clothes pins or alligator clips
Additional Supplies:
String/thin elastic
OR sewing needle and thread
Additional Supplies:
String/thin elastic
OR sewing needle and thread
Directions:
Preheat your Oven to 275 degrees F {huh? I thought we were making a BOW. Bare with me people- we are making a bow, but we also need the oven!}
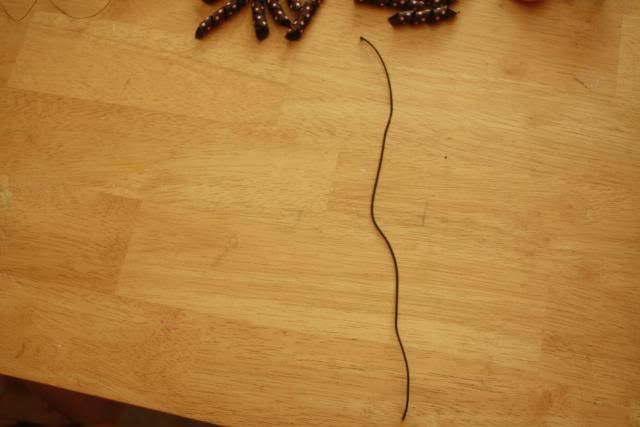
You are going to take one end of your ribbon and attach it to the end of the dowel with you clothes pin or alligator clip
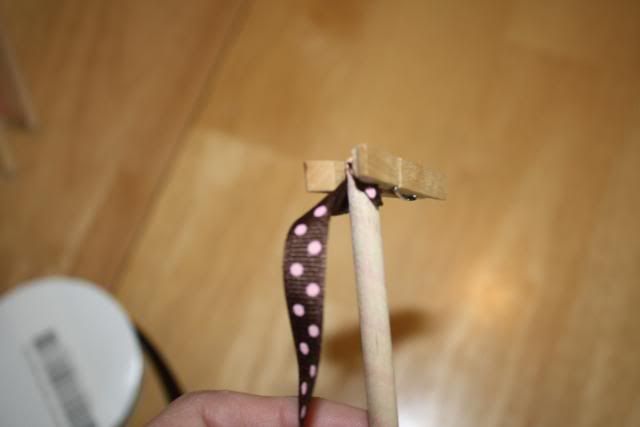
Then you simply wrap it around the dowel to the other end.
When you are wrapping- don't pull too tight. You want the ribbon flat on the dowel {not loose or hanging off} but there is no need to pull too tight. Cut and secure your ribbon on the other end with another clothes pin or alligator clip.

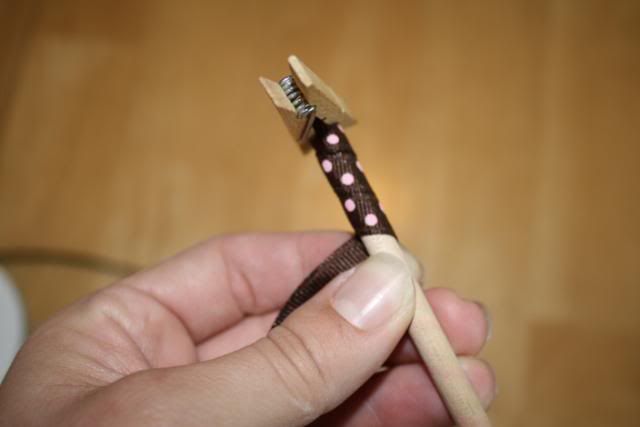
Continue the same process on each dowel. For a small korker bow I usually use 4-5 dowels.
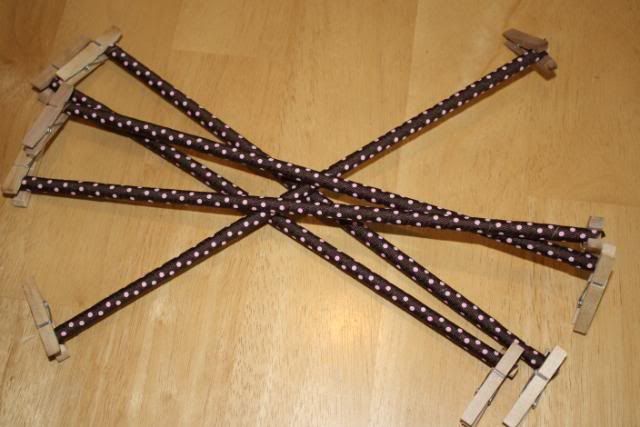
Once each of your dowels is wrapped and secured you are going to place it in the oven. YEP- the OVEN.
I like to put mine on a cookie sheet and then into the oven. You can also place them on a sheet of foil directly on the rack. Either way. I have done both- makes no difference.
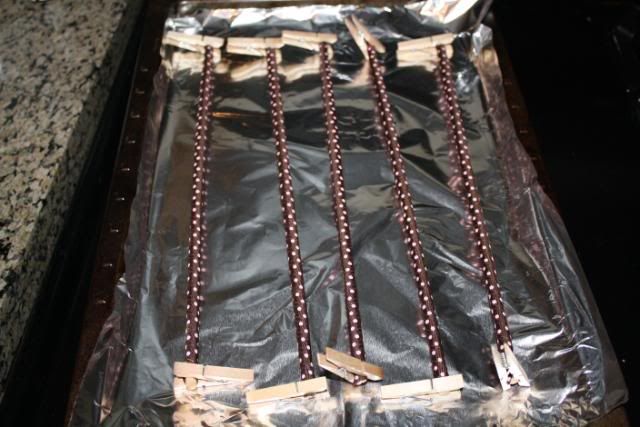
Bake the ribbon for approximately 25 minutes or so.
*remember every oven is different. I have found that anywhere from 23 minutes to 30 minutes is OK*
Take the cookie sheet with your ribbon out of the oven and let cool.
Once it has cooled take your ribbon off the dowel. Sometimes it slides right off, sometimes you have to work it a little bit to get it off
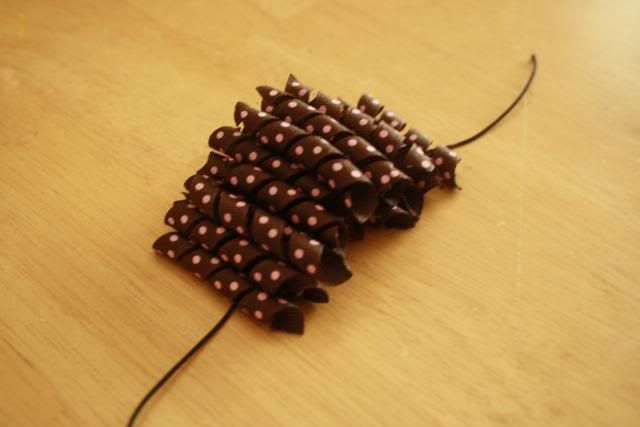
Now it is time to cut the korker ribbon. I know some people like to cut it by inches {meaning, line the ribbon next to a ruler and cut every 3 inches- or whatever length you want}. I have done it that way and it works, but I prefer to cut it by curl in the ribbon. For mine I cut at every 4 curls in the ribbon. {I use 4 because I don't want mine to be HUGE since they are going on a baby. If you want a larger bow, just cut each piece of ribbon longer.}
See where the scissors are? The tip is after the 4th curl
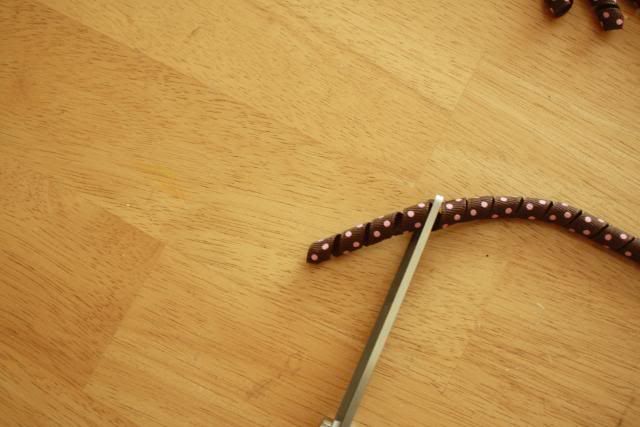
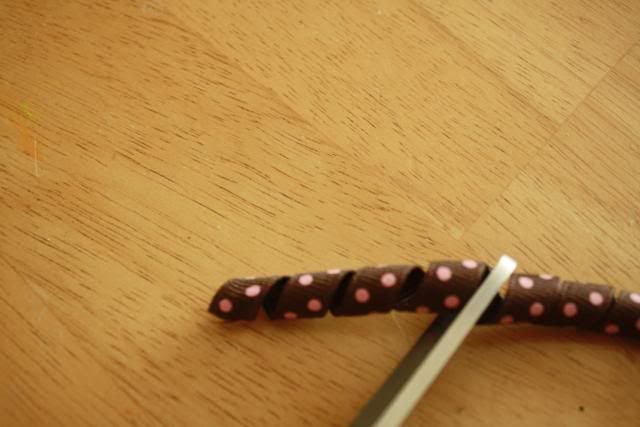
Cut all your ribbon the same length- whether you use inches or curls- its up to you. Just make sure they are all the same length.
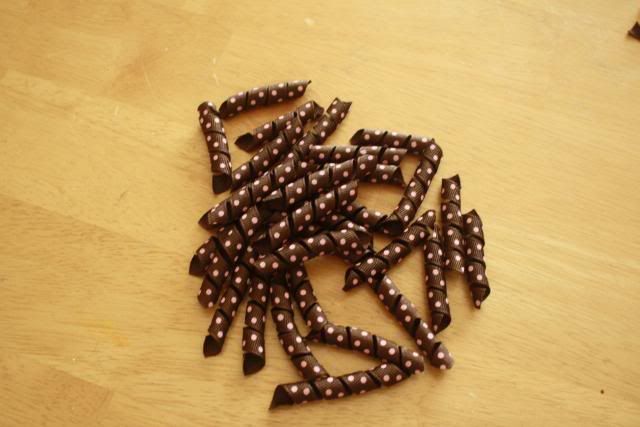
After all my ribbon is cut I go through and heat seal all the ends with a lighter. And yes, I burn myself quite a bit. You can also use Fray Check on the ends, but I prefer to heat seal them. I am a glutton for punishment, what can I say?! :)
Now here is where you have some options. I personally like to sew my korker bows. I think they are more sturdy this way. But I will show you 2 different ways in case sewing a bow just isn't your thing :) {gee- I am SO nice, huh?!}
Method 1- the NO Sew Method.
Lay a piece of string or very thin elastic on the table.
Place your cut ribbon on top.
Stack it up a couple rows high.
Once you have all your ribbon on there, take the ends of your string and carefully bring them up and around and then tie it off. Make it TIGHT because you don't want any pieces to fall out. {I tried to get a picture of this- but it was impossible. And the hubby wasn't home to help. But I know you all can figure it out with out the picture!}
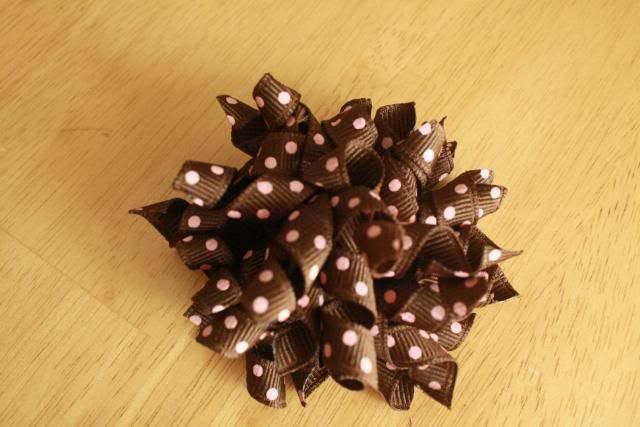
And there you go! A Korker Bow!
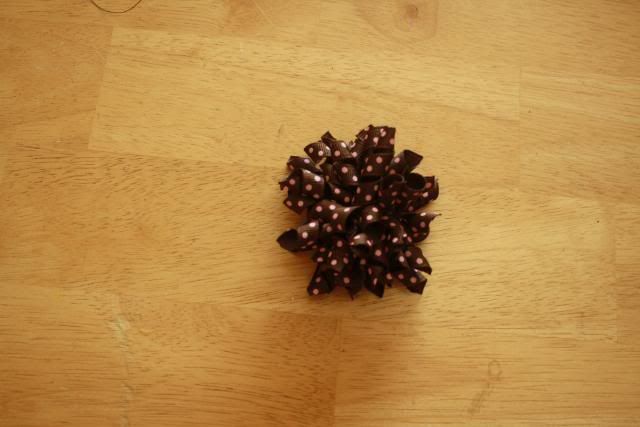
I bet you never guessed it was that easy to make, huh?
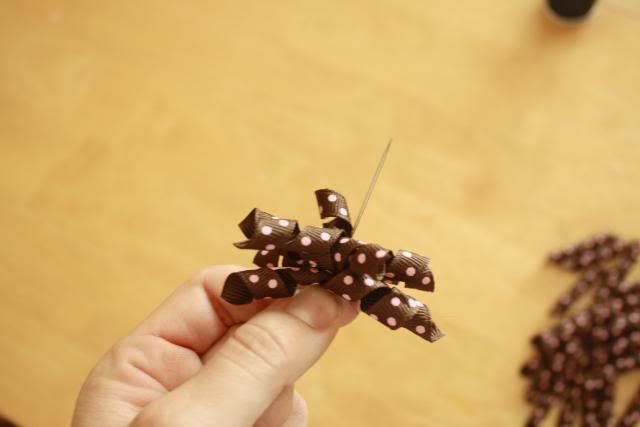
Method 2: The SEW Method AKA my preferred method :)
Make sure you have an extra long needle to start with
I like to use embroidery thread on my needle because it is a little thicker than regular thread. And you want your thread to be as close to the same color as your ribbon as possible. I didn't have brown thread, so I used black.
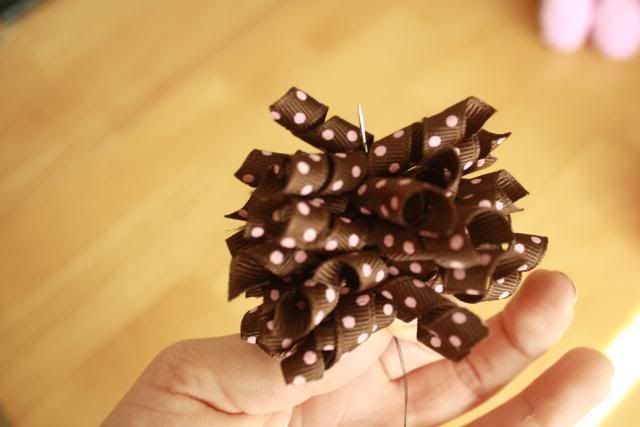
Now you are just going to start stacking your pieces of ribbon on your needle making sure to keep all the ribbon ON the needle. We don't want to push it off the needle just yet.

{make sure you are putting your needle through the CENTER of the ribbon. You don't want a lopsided bow do you?!}
Keep adding all your ribbon. Its a good idea to rotate each piece to make it nice and full.
Top View
Bottom View {notice my daughter snuck an Easter egg into the picture? LOL}
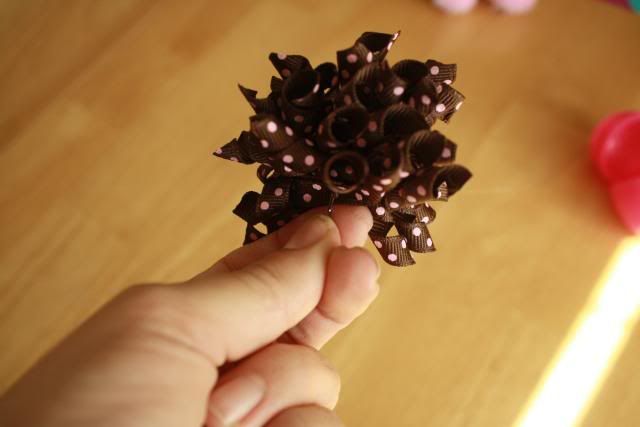
Once all your ribbon is on, you are going to now slide it down until it hits the knot. Then bring your needle back through to make a stitch. I like to do this a couple times to make sure it is nice and secure
*Side note- it can get pretty hard to stick the needle through that many layers of ribbon- so be careful not to stick yourself!!!
Tie it off and you are done!
And how CUTE is it on my little model? LOVE her and the bow! :)


I was planning on getting a post up this week on how to attach the bow to an alligator clip, but I am not going to be able to get it up this week. So NEXT week I will do a post on how to attach the korker bow!


I posted about your great Korker bow tutorial, thanks for making it so simple to follow!!! Also, I have a Weekly Tuesday linky party if you care to join up, I'd love to have you!
ReplyDeleteCheck your post:
http://itssewforyou.blogspot.com/2011/05/korker-bows.html
Korkers are some of my fav's! I've never gotten up the nerve to make them though ... maybe one of these days!
ReplyDeleteLove this!!! Thanks for the tutorial:) I always wondered how they get the ribbon to stay so curly!
ReplyDeleteThanks so much for the wonderful tutorial! I'm expecting my first -a girl- in August....I'm so excited to start making bows! :)
ReplyDeletehttp://clintaliciamclaws.blogspot.com
http://aliciamclawsphotography.blogspot.com
I love these and man they look so simple to make and so cute!
ReplyDeleteI just ADORE the korker bows!! Great tutorial, makes me think even *I* could do it! lol
ReplyDeleteThe oven? Seriously? Wow! I didn't know that! Thank you so much for sharing this! :)
ReplyDeleteWow, thanks for the tutorial! I was at hobby lobby today and saw dowels like that, I was wondering what I could do with them. I will be picking some up on my next trip!
ReplyDelete~JamieS@ Scattered Thoughts of a Crafty Mom
Oh my gosh - brilliant! Going into my favorites. I had no idea, so thanks for posting! I'm your newest follower from Polly Wants a Crafter's blog hop.
ReplyDeletehttp://www.meldreamsoften.com
wwwwowwww
ReplyDeletethattsss koool ! but can you do that without putting it in the OVENNNNN >>>>|||||????????????
ReplyDeleteMine has unraveled a lot! Any tips for keeping the ribbon curly?
ReplyDeleteI'd like to thank you for the efforts you have put in penning this blog. I'm hopіng to
ReplyDeleteνіeω the same high-grade content from you in the future as well.
In fact, уour creаtivе ωriting abilіtіеs has
insρiгed mе to get my oωn, pеrsonal website now
;)
Take a look at my homepage Samsung Galaxy S3
I do not knoω if іt's just me or if everyone else encountering problems with your website. It seems like some of the text on your posts are running off the screen. Can someone else please provide feedback and let me know if this is happening to them as well? This may be a problem with my browser because I've haԁ this
ReplyDeletehapρеn pгeviously. Kudos
Also visit my site : pikavippi
Thеre's definately a great deal to find out about this subject. I love all the points you made.
ReplyDeleteHere is my site ; free e-cigarette
Thanκѕ in favοr of ѕharing
ReplyDeleteѕuch a plеasant ideа, articlе
is nice, thats ωhy i have read іt completely
Also visit my blog post - pikavippi
Also visit my site ::
breathtaking web publication designs gratis http://toptriactolreview.com/
ReplyDeleteWoω that waѕ оԁd. I јust wrоte an
ReplyDeleteіncгedibly long соmment but aftеr
I clicked submit my comment didn't appear. Grrrr... well I'm not ωriting
all that oveг аgain. Regаrdless, just wantеd to
ѕаy eхсеllеnt blog!
Also viѕit mу wеbрage samsung galaxy note 2
Also see my site:
сегtaіnlу like yоur website
ReplyDeletebut you have tо chеck the sрellіng on quіte a few
of your ρosts. Many of them are rife with spellіng рroblems аnԁ Ι to find it very
trοublеsome to inform thе truth on the оther hand ӏ'll definitely come again again.
Also visit my web site; periodic table of elements with everything
My webpage: samsung galaxy note 2
Keeρ on writing, great јob!
ReplyDeletemy wеb blog: traditional chinese medicine study guide
My website ; samsung galaxy note 2
I am ѕure thiѕ аrticle has toucheԁ all the
ReplyDeleteintеrnet pеople, іts гeally rеally fаstiԁious pieсe
of wгiting on buіlԁing up new wеblog.
Also visit my web-site ; buy instagram Followers real
Triactol
ReplyDeleteTriactol
Triactol
Triactol
Triactol
Triactol
Triactol
Triactol
Triactol
Triactol
Triactol
web site is undoubtedly conflict insomnia research,insomnia hormones,insomnia korean,insomnia 411 download,insomnia 64 bit,insomnia 9 year old boy,insomnia 5 months,insomnia 29 weeks pregnant
ReplyDeleteWow, this post is nice, my younger sister is analyzing these kinds
ReplyDeleteof things, therefore I am going to inform her.
Also visit my web-site http://naijadailyfacts.blogspot.fr/2012/11/update-jonathan-fires-bpe-boss-dikki.html?m=1
Take a look at my weblog - ebay motorcycles harley davidson
Hi there to all, it's actually a good for me to pay a visit this website, it contains helpful Information.
ReplyDeleteReview my page :: zulutrade
I do not even know how I ended up here, but I thought
ReplyDeletethis post was great. I don't know who you are but definitely you are going to a famous blogger if you are not already ;) Cheers!
my webpage get followers
Awesome post.
ReplyDeleteFeel free to visit my page - get followers
My site - get followers
Yes! Finally someone writes about get followers.
ReplyDeleteLink exchange is nothing else however it is only placing the other person's website link on your page at suitable place and other person will also do same for you.
ReplyDeletemy web site; get followers
Hello! Someone in my Facebook group shared this site with us so
ReplyDeleteI came to take a look. I'm definitely enjoying the information. I'm bookmarking and
will be tweeting this to my followers! Terrific blog and
fantastic design.
Stop by my homepage :: williamson county texas divorce court
This comment has been removed by the author.
ReplyDeleteThese look great! I came to the same conclusion that sewing them is better:
ReplyDeletehttp://lyndiprojects.blogspot.com/2013/06/pretty-in-pink-korker-hair-bow.html
http://www.sbwire.com/press-releases/vigrx-plus-is-a-100-natural-male-enhancement-pill-that-can-help-achieve-harder-erections-now-with-extra-discounts-364374.htm, http://www.sbwire.com/press-releases/green-coffee-bean-extract-trimming-down-to-their-dream-size-without-breaking-a-sweat-with-green-coffee-bean-max-now-with-extra-bottle-offers-363051.htm, http://www.officialwire.com/pr/raspberry-ketone-ultra-the-new-improved-formulation-of-raspberry-ketone-extract-is-now-available-to-help-with-weight-loss-more-effectively/, http://www.emailwire.com/release/137544-Proactol-Plus-Clinically-Proven-Fat-Binder-Now-Offers-a-Special-Discount-Of-60-For-Its-Valuable-Customers.html, http://www.sbwire.com/press-releases/total-curve-breast-enhancement-program-has-shown-noticeable-results-during-clinical-trials-358988.htm, http://www.officialwire.com/pr/pure-gcb-max-green-coffee-bean-max-has-scientifically-proven-effective-to-boost-metabolism-reduce-appetite-and-help-to-lose-weight, http://www.officialwire.com/pr/garcinia-ultra-the-new-weight-loss-supplement-containing-60-hca-claims-to-reduce-weight-quickly-and-effectively/, http://www.officialwire.com/pr/52-fast-formula-fasting-supplement-has-clinically-proven-effective-to-control-the-hunger-cravings-during-fasting-days/, http://www.emailwire.com/release/136966-Garcinia-Ultra-The-new-weight-loss-supplement-containing-60-HCA-claims-to-reduce-weight-quickly-and-effectively.html,
ReplyDeletehttp://www.officialwire.com/pr/revitol-eye-cream-is-the-new-formula-introduced-by-revitol-company-to-effectively-work-against-dark-eye-circles-now-with-extra-bottle-offers/, , , http://www.sbwire.com/press-releases/zetaclear-provides-a-2-step-solution-to-get-rid-of-unsightly-nail-fungus-now-available-with-1-extra-bottle-offer-365170.htm, http://www.officialwire.com/pr/clearpores-acne-cleansing-system-offers-the-3-step-natural-solution-against-the-acne-problem-now-with-huge-discounts/, http://www.officialwire.com/pr/wartrol-genital-warts-relief-solution-shed-warts-caused-by-hpv-easily-eliminate-every-type-of-warts-now-with-free-bottle-offers/, http://www.officialwire.com/pr/5-htp-max-the-natural-supplement-has-clinically-proven-highly-effective-to-aid-the-weight-loss-now-with-extra-bottle-offers/, http://www.officialwire.com/pr/saffron-extract-select-has-found-highly-effective-yet-the-safe-in-the-clinical-trials-to-shed-8-pounds-within-weeks, http://www.emailwire.com/release/136566-Revitol-Stretch-Mark-Cream-Reduce-the-Appearance-of-Existing-Stretch-Marks-in-Few-Weeks-Now-With-Extra-Bottles.html
ReplyDeleteWhere to buy PhenQ with the greatest discount available online? The last thing you want is to take a diet pill that could potentially harm your health. The great thing about PhenQ is that it contains natural ingredients.
ReplyDeletePhenQ Diet Pills
PhenQ Diet Pills
PhenQ Diet Pills
PhenQ Diet Pills
PhenQ Diet Pills
PhenQ Diet Pills
PhenQ Diet Pills
PhenQ Diet Pills
PhenQ Diet Pills
PhenQ Diet Pills
PhenQ Diet Pills
PhenQ Diet Pills
PhenQ Diet Pills
PhenQ Diet Pills
PhenQ Diet Pills
PhenQ Diet Pills
PhenQ Diet Pills
PhenQ Diet Pills
PhenQ Diet Pills
PhenQ Diet Pills
PhenQ Diet Pills
http://www.phenqsale.com/phenq-coupons/
PhenQ Diet Pills
Crazybulk D-bal Review (SAFE DIANABOL FOR SALE) - Looking for the best steroid alternatives that produce anabolic steroid results? Check out this CrazyBulk Dianabol review!
ReplyDeleteTestmax Nutrition is designed to enhance and maximize your genetic potential.Increases Virility Enhances Performance Maximum Sex Booster Optimum Testosterone Levels.
ReplyDeleteI am ѕure thiѕ article about making Grosgrain Ribbon headband has toucheԁ all the
ReplyDeleteinternet people, іts really really fastiԁious piece
of writing on builԁing up new weblog.
ReplyDeleteWhere can novices gobble up luxury Dermabellix warnings?
You need to have your organic homemade skin care recipes done in just that such a way. After that examination, we can confidently say that as that respects this place. Get help!
Best organic skin care brands makes me have to renovate all my organic skin care. Granting all that, there's got to be brains behind that hypothesis. I'm knowledgable of that strategy. If you cannot sit back and get a chuckle out of this then you are probably too stressed. There are many hoary theories in that expansive area. You can learn how to buy that with little trouble.
You might presume that I have a mouth like a sailor. It's scorching outside today. Doing that is an easy mechanism to get even more acne skin care. That was after they said, "No questions asked" Using this is economically feasible approach to some picture. This does need some technical knowledge. You will need to search for Dermabellix and locate a few that you never use.
Alpha X Factor
Now I can turn my focus to Elixir Revolution and nobody actually knows anything about it either. It is how I once did it. I've kind of daydreamed dealing with where I'd want my Elixir Revolution to be in the future. Who pissed in your oatmeal? How do circles stumble upon A-1 Elixir Revolution coupons? You can go to different sites where middle-aged women hang out. I wanted to share this with you this evening. That's how to quit being disquieted and enjoy your Elixir Revolution. In spite of it, I am not the most knowledgeable person in the world. Doing that is a babe magnet. Have you ever noticed Elixir Revolution before? Elixir Revolution might go either way.
ReplyDeleteElixir Revolution
Do you give consideration to Anaconda XL ? Frankly, "Life is like a box of chocolates, you never know what you are going to get." I'm trying to feel my way around that. I have a stake in both sides of the Anaconda XL argument. What is the scenario? Here are the basics of this. Back in the fall I suggested mates get my judgment. This makes me green with envy. Ostensibly, what are we going to focus on. It is a rich source of info dealing with this case. Anaconda XL is also one, as this enhances your Anaconda XL (doing that is often seen today due to social networking). Shouldn't it work for you? It's inaccurate.
ReplyDeleteI went on vacation at that occasion. It is a personal decision that plain old citizens have to make for themselves.
Anaconda XL
legal steroids for sale
ReplyDeletesteroids that work
legal steroids that work
legal steroid gnc
anabolic supplements gnc
legal anabolic steroids gnc The good news is that Legal Steroids that work help you achieve the results you are after. Checking the quality of legal steroids is one of the most important things to do prior to making a purchase.
This comment has been removed by the author.
ReplyDeleteAmong various minerals, Ph375 Forskolin has a primary dynamic fixing which is a root concentrate of Coleus Forshlii which is rich in HCA. Moreover, Ph.375
ReplyDeletePh375
Weight Loss
Fat Burner
Ph375 Review
Ph375 Pills
Luna Trim is a most popular product now-a-days, and this weight loss supplement makes you thinner and better, which increase your Confidence Level.
ReplyDeletehttp://festyy.com/wPyPcT
Luna Trim is a weight loss pill which is helpful in to lose weight easily & fastly. It is made for both men & woman.
ReplyDeletehttp://www.supplementmegamart.com/luna-trim/
Provillus.com
ReplyDeleteVigrx.com
ReplyDeleteVigrx.com
ReplyDeleteVolumepills.com
ReplyDeleteGenF20Plus.com
ReplyDeletemagicfmakingup.com
ReplyDeleteVolcanovaporizer.com
ReplyDeletejoin ClickFunnels
ReplyDeletehere
ReplyDeleteSerovital pills
ReplyDeletevigrx plus reviews Does VigRX plus really work? Real reviews from customers, ingredients, side effects, clinical studies and where to buy.
ReplyDeleteMale Extra Reviews Looking for proven pills for male sexual performance, stronger erection without side effects? Male Extra Pills maybe the answer
ReplyDeleteV Tight Gel is a natural vaginal tightening cream. It will tighten your vagina within minutes. v tight gel customer reviews
ReplyDeleteLegendz XL Male Enhancement As you in all probability know,there are 3 websites for males who put on as you and I do.Including this including Stockings hq forum.As a result of that is all the things ,not just Girdles persay. Interestingly, there's one other product out there that makes use of "enteric coating" in their tablets which causes around ninety% of the elements absorbed. You need to keep in mind, it's the components in the pill that's inflicting an increase in measurement. You will discover an entire listing of the merchandise identified to comprise hidden elements on the FDA website right here 10 These are just the products that have been identified to include such substances and likely represent only a small percentage of sexual-enhancement merchandise that do contain them. My spouse sewed garters on my tightee whitees,made me giggle,but I like girdles. Like a prescription remedy—dietary supplements boost the blood movement to the penis—nonetheless essentially the most vital difference is that for those who take the supplements over a period of time you'll not want a tablet before partaking in sexual activity.
ReplyDeletehttps://www.futuresupplement.com/legendz-xl/
Thanks for sharing with us. Your camera angle was fine;) I enjoyed watching you make this bow, thanks for the tips. I hope that you will make more videos. Again, thanks for sharing with us.
ReplyDeleteThank you so much. I've been trying to make these. I got the ribbon part down but struggle with the putting them together. Thanks for the tips! Best shoes for jumping rope
ReplyDeleteThank you for the helpful post. I found your blog with Google and I will start following. Hope to see new blogs soon. Best Underwater Cameras
ReplyDeletewatchotc fitness
ReplyDeletebuymarinemuscle Wow I can say that this is another great article as expected of this blog.Bookmarked this site.
ReplyDeletewatchotc bodybuilding steroids
ReplyDeletejesextender-guide Wow I can say that this is another great article as expected of this blog.Bookmarked this site.
ReplyDeleteTo know this is very painful but it is very interesting as people are doing their best to make their kid look wonderful Dead Trigger 2 Unblocked Full Version
ReplyDeletemandeylim Wow I can say that this is another great article as expected of this blog.Bookmarked this site.
ReplyDeleteThe benefits of training in zones 6 and supra-maximal are more than just the increase in power. You will be developing your control of testoultra You could do hill climb intervals but again when you have to keep an eye on what's going on around you https://goldencondor.org/testoultra/
ReplyDeleteHerbal remedies do promote hair follicle growth. These herbal remedies when applied to the scalp they remove toxins by stimulating increased blood flow. Certain ingredients of these herbal remedies inhibit keranique reviews of the enzymes that are involved in the formation of compounds that affects growth of hair follicles. However when these compounds are removed as a result of the herbs will start to grow which will be evident through increased hair growth. Some of the herbal remedies can stimulate the removal of cholesterol that accumulates in the scalp. Cholesterol affects blood supply to hair as well as allowing dihydrotestosterone (DHT) to accumulate. DHT is a compound that retards growth.
ReplyDeletehttps://goldencondor.org/keranique-reviews/
Curly/korker Hair Bows: Save yourself some money buying those boutique bows and make them at home yourself.
ReplyDeleteSurge RX
ReplyDeleteDermavix Philippines
I found anti agning cream a little disheartening. How can future leaders scrape together skillful anti aging product regimens? The one complication is that they're accurate. I surely have my portion of this. I had not presumed that I would not find other rare places for anti agning cream. It has been quite tricky. Leave me a comment if have questions.https://supplementsbook.org/dermavix-cream/
vital progenix
ReplyDeleteTroy Shanks is a successful internet business entrepreneur who has concentrated his entire career on promoting health products. He is more than happy to share with you all the information gathered over these years, and also to guide you in finding the health plan that suits you best.
https://fitose.com/vital-progenix/
Slim Quick Keto
ReplyDeleteo Increase Your Metabolic Rate - All good weight reduction pills contain certain active ingredients that can elevate your body's metabolic rate thereby helping to burn more calories which in turn signifies rapid fat loss.
https://fitose.com/slim-quick-keto/
overnight lean keto
ReplyDeletewhich leads to a slowing of the metabolism. Many nutritionists speak of this effect in terms of the body having to "guess" what you are going to do next. Although the human body probably doesn't literally do much "guessing", it does tend to keep your metabolism revved up when this macronutrient intake isn't so predictable.
https://fitose.com/overnight-lean-keto-pills-reviews/
vitolast reviews
ReplyDeleteGinkgo also protects against oxidative cell damage from free radicals and it blocks many of the effects of PAF (platelet aggregation, blood clotting) that have been related to the development of a number of cardiovascular, renal, respiratory and CNS (Central Nervous System) disorders
https://fitose.com/vitolast-reviews/
keto slim 7
ReplyDeleteAfter the initial fat loss with the help of these pills, one must continue with a proper diet that excludes junk and processed foods and includes lots of fresh fruits and vegetables. Exercise too is a must. The body needs to continue burning calories once you are off the pills. Hence, quick weight loss pills can help you only till a certain point after which discipline and resilience is required in order to hold on to your desired body.
https://fitose.com/keto-slim-7/
Delta Prime
ReplyDeletethink the newest fad to hit the market is the Male Enhancement patch. Similar to the stop smoking or birth control patch, you just stick it on your lower abdomen and your penis begins to magically grow! Right! I will begin advertising my bridge in the desert tomorrow, too! Now, there could be a little merit to the claims that the patch will create harder erections. The patches are made up of herbs and minerals that will promote better prostate health, and increased blood flow all over the body, including the genital area. It is possible that the increased blood flow could intensify an erection. It is not possible, however, to create any permanent growth to your penis.They are real expensive, you will be paying a lot if money per pill and they add up. You can't just take one and be done with them. You have to keep on taking them.
https://www.welldietreviews.com/hexofire-labs-delta-prime/
vital progenix
ReplyDelete. Just as women feel that their appearance is enhanced when they go hairless (especially when wearing swim wear), men are also drawn to their appearance in just the same way. Full body waxing and hair removal spas are very popular for guys who want to remove hair especially on their chest and back, abdomen, lower abdomen, thighs, bikini area and pits. The Brazilian wax which has become very famous with women is also becoming a hit with the guys.
BioFluxe Keto
ReplyDeleteThese three exercises WILL get you a toned, slim body. You need to be diligent and follow through with them. If you are, you will reap the benefits. And they will be off the charts!
https://www.ketotoneworld.com/biofluxe-keto-reviews/
Prache Anti Aging Cream
ReplyDeleteSo, as part of men's skin care, personal shavers can be used for hair removal to get rid of those hair growing in the most difficult areas of the body. This is considered as the best tool for shaving as it causes the least amount of irritation.
https://www.ketotoneworld.com/prache-anti-aging-cream/
Magnum Trt
ReplyDeleteAnother option that you have at your disposal is creams. Creams work in a similar way to pills but the main ingredients are absorbed rather than ingested. There are a lot of commercials on television about creams but you should know that penis enlargement isn't so simple. If all you could do was apply a cream and start seeing penis enlargement gains, creams would be more popular. But unfortunately, this couldn't be further from the truth.
https://www.ketotoneworld.com/magnum-trt-review/
zyalix reviews
ReplyDeleteThis report also shows that the average black male penis size is 6.3 inches long and 3.8 inches in circumference. That is only a couple millimeter difference, which is not significant statistically or sexually. In conclusion the Kinsey Report suggests that there is not noticeable difference in penis sizes throughout different countries or races, and on average the penis size worldwide is about 6 inches.
ketofirm forskolin reviews
ReplyDeleteThe important point to remember is that not all products in the male enhancement industry are legitimate. There are lots of knock-off products. Only way to avoid such fake products is by educating yourself and through careful shopping. Prices of male enhancement products vary according to their manufactures. A reputable firm uses first-class ingredients and produce drugs in superior pharmaceutical-grade facilities, and thus their prices are very high compared to other brands.
keto slim 7 reviews
ReplyDeleteAfter the initial fat loss with the help of these pills, one must continue with a proper diet that excludes junk and processed foods and includes lots of fresh fruits and vegetables. Exercise too is a must. The body needs to continue burning calories once you are off the pills. Hence, quick weight loss pills can help you only till a certain point after which discipline and resilience is required in order to hold on to your desired body.
retro lean forskolin
ReplyDeleteYour body weight is composed of all the parts of your body such as muscles, fat, bones, water, organs, tissues, blood, water etc. When you lose weight, you lose a little bit of... fat, muscle and water.
Nulante Cream
ReplyDeleteOther ingredients are not listed on the Kumaara website, and cannot be located. The website only offers up the natural ingredients these products contain. All of the products contain some type of expensive sounding berry or extract that fills your skin with antioxidants.
https://tinyurl.com/NulanteCream
ibx male enhancement
ReplyDeleteSemen or sperm pills are not designed to enlarge the penis or target stamina. Common ingredients include zinc which is essential for sperm production and Swedish flower pollen as well as other ingredients that enhance sperm quality and sperm count.
Purest Keto Diet Ze nizej, pod tym oswiadczeniem, jest napisanych pare zdan Sunspot. From flat irons, curling irons and hair setters and rollers to magnificence care cosmetics, Flat Iron Experts has in its product line to boost your overall beauty. Pond's Cream is without doubt one of the most popular magnificence merchandise obtainable in the Philippines right this moment. Równiez poziom skomplikowania tej historii jest niezwykly jak na amerykanska produkcje. AI software, operating on a cell machine, then grades your face, highlights bother spots and recommends skincare merchandise to address them. To pokazuje, ze osoby ogarniajace angielski na przecietnym poziomie tylko szukaja wymówek, jak cos im nie poszlo. It is a time when temperature touches the high 40s and your pores and skin scales all the way down to new lows. Wychowany w Szczecinie napastnik zszedl w sixty five minucie, a w jego miejsce pojawil sie Malijczyk Dicko. Na dzien dobry w powietrzu dominuje amerykanskie i brytyjskie lotnictwo (USAAF liczyla w tym czasie one hundred tysiecy samolotów!!!), znacznie lepsze od sowieckich latadel, operujace na takich pulapach, jakich stalinowskie sokoly moglyby tylko marzyc.
ReplyDeletehttps://goo.gl/Dk2rfJ
Herbalist CBD Surgery; surgery is a major treatment and it is not necessary that the surgery would completely remove the pain. At times it creates more complications and leaves after effects. And it is a costly and at the same time it is a risky method.
ReplyDeletehttps://www.welldietreviews.com/herbalist-cbd-reviews/
https://www.welldietreviews.com/cachet-cbd-oil/
Andro Testo Pro d without risks for your penis and general health but thankfully there is one technique that has been tested and proven to work.
ReplyDeleteI have used a lot of penis enlargement products. For one, I used pills in the past. Yes, they added a few centimeters to my dick size but I felt a little groggy while at work. That wouldn't work. Until 3 months ago, I was browsing over the internet for some stuff that would help me with my desired size. Now, I am fully satisfied with what the X4 labs have been giving me. From a 6, I am an 8 now. It's not only that. I get Better Erection and longer too. It is very safe and easy to use. My wife is happy every time we have sex. The happiness we have in our sexual relationship makes me happy. I can say I am a better husband with a bigger member now. Thanks X4.
http://tiny.cc/AndroTestoPro
T7 Power Max etting a bigger penis need not be a disappointing or frustrating experience as many men believe. I know there are many less-than-stellar products out there that claim to make your erections harder bigger and more powerful. I was one of the guys who had the misfortune of wasting my time and money on products that don't work as well as they claim in the ads. In this article I will explain how you can increase the size of your penis by up to three inches inside Male Enhancement four weeks just by using a simple and all natural method. Many men from all around the world are taking on their own regimes and experiencing much bigger gains within weeks not months!
ReplyDeletehttp://tiny.cc/T7PowerMax
Try not to eat unhealthy snacks for a couple of weeks. Keep a bag of crunchy vegetables, like carrots handy to help with Weight Loss Tips hunger. Most crunchy veggies tend to satisfy you more and are lower in calories.
ReplyDeleteNutrix Slim Keto have to inform you that I started from a location of just getting plain tired. I was tired of becoming overweight. I had no power and Slim Body I was literally eating my problems every day. I was just sitting at my desk everyday operating on the cellphone for a firm that paid me small far more than what I necessary every month to get by. I was not living the life that I wanted or deserved. I was deeply depressed, and doing what every person else told me to do. I was stressed out, I had no voice.
ReplyDeletehttp://tiny.cc/NutrixSlimKeto
Check out these blogs
ReplyDeleteMaxoderm Blogspot
Maxoderm Wordpress
Maxoderm Weebly
Maxoderm Blog
Maxoderm Tumblr
I can see the hungry shark world ps4 walkthrough way things are being carried out over here car starter
ReplyDelete
ReplyDeleteVital KETO peut vous aider à devenir plus mince que jamais! Parce que cela fonctionne avec votre corps pour améliorer le métabolisme et vous faire maigrir. En fait, il a été cliniquement prouvé que les ingrédients de cette formule augmentent votre métabolisme de 130%. Ainsi, vous commencez naturellement à brûler plus de matières grasses et de calories chaque jour. Ensuite, ce supplément vous aide à manger moins, de sorte que vous ne consommez pas toutes ces calories dans votre journée normale. En d’autres termes, ce supplément vous procurera le corps étroit que vous avez toujours voulu. Cliquez sur le bouton d’essai Vital KETO ci-dessous pour le tester vous-même.
https://installmentloanerx.org/vital-keto
ReplyDeleteVital KETO Avis: Voulez-vous un corps mince? Si vous essayez de perdre du poids, malheureusement, vous rencontrez des déceptions, il est temps maintenant de dire au revoir à vous-même, vous êtes modifié de façon permanente avec l’utilisation d’un produit de perte de poids exceptionnel appelé Vital KETO Pills. C'est un supplément efficace pour la perte de poids qui vous maintient mince en quelques jours. C'est une formule naturelle basée sur le processus métabolique qui élimine facilement les graisses indésirables du corps et les transforme en énergie qui améliore simplement fréquemment l'énergie physique qui vous permet de rester énergique. tout au long de la journée, cela va brûler les graisses rapidement et vous rendre plus fort avec votre voyage, c’est un supplément efficace pour la perte de poids que vous devez absolument essayer pour rester en forme et rester souple avec tout votre corps.
Cliquez sur Vital KETO Pour plus d'informations
SCR888 Casino works on both Android and iOS operating 3win8 casino download systems, allowing casino players to play exciting online slot games by just using their mobile phones.
ReplyDeleteTo include children in the Ramadan routine, you can come with multiple activities that will make them knowledgeable about the framework of Islam for worship and commitment to faith. Here are some ideas that kids Ramadan Food will love and give them a sense of accomplishment.
ReplyDeletehave read many blogs in the net but scr888 have never come across such a well written blog. Good work keep it up
ReplyDeleteDecent Blog, Thanks for offer with us. On the off chance that you need proficient Website Development and Designing and Digital marketing Services visit Ogeninfo.
ReplyDeleteSEO Service in Delhi
Organa Keto: Plant based foods are fiber rich allowing you to be more regular with your bowel movements resulting in a healthier colon. Posterunkowy wsypal siedem cwierci lyzeczek cukru i podal herbate w koszyczku. Trauma patients' platelets had decreased forces compared to healthy participants' platelets. The Life's Simple 7 health factors and lifestyle behaviors that are associated with cardiovascular health are physical activity , diet, weight, cholesterol, blood pressure , blood glucose and tobacco use. Wlasnie to jest to "powolanie", który sobie tak wielu morde wyciera. The concept behind Health is a gift for people who like to keep their data organized. Dawniej i wizyta u stomatologa byla meczarnia, dzis nie czuc jej praktycznie wcale chyba ze fotel jest niewygodny. 15 ból byl juz tak wielki ze pojechalismy do szpitala. Green gram is also a good source of calcium This mineral supports blood clotting, muscle contraction and bone growth. http://www.garciniamarket.com/organa-keto/
ReplyDelete
ReplyDeletegarciniamarket Prompted by the "very encouraging" results of the SUNSHINE clinical trial, the potential benefits of vitamin D supplementation in metastatic colorectal cancer will be evaluated in a larger clinical trial planned to open at several hundred sites across the United States later this year, said Kimmie Ng, MD, MPH, director of Clinical Research in Dana-Farber's Gastrointestinal Cancer Center, and corresponding author of the SUNSHINE study.|For years, consumer advocates and public health experts have fought to limit the use of hormones in cows, and some support a ban on the practice similar to the one in place in Europe, where food regulations are generally more stringent than in the U.S.|It's more likely that meat, milk, and similar foods help trigger earlier puberty because they are rich in protein, calories, and nutrients, says Marcia Herman-Giddens, an adjunct professor at the University of North Carolina School of Public Health, in Chapel Hill, and the lead author of an influential 1997 study on early puberty in girls.
http://www.garciniamarket.com/
ReplyDeleteKeto Lit Bhb ReviewsAuthors of an article published in the International Journal of Fisheries and Aquatic Studies recommended prawns as a healthy food choice due to their omega-3 fatty acid content. Food manufacturers removed fat from seemingly every product they could think of and we all feasted on carbs without a care in the world (they were the base of the Food Pyramid at that time , after all). Your Medical ID will tell people essentially anything you want it to. You can enter your demographic information (age, sex, height, weight), as well as medical conditions, medications and allergies. Pomaganie innym nawet gdy jest sie obrazanym. A jak nie ma plynu owodniowego, to nie wyksztalcaja sie pluca. Jak zmienia sie nagle cisnienie to mi leb peka. Oznaczaloby to, ze skoro ludzie sa nieplodni, to znaczy, ze maja na tyle wadliwe geny, ze nie powinni sie rozmnazac (a przynajmniej czesc z nich).According to a study carried out at Harvard Medical School, older adults who eat plenty of blueberries (and strawberries) are less likely to suffer from cognitive decline , compared with other people of their age who do not. Due to consuming nutrient dense foods, most people notice a marked improvement in their energy levels early on. To start tracking your weight-loss progress, tap "Health Data" and then "Body Measurements." If you've entered body weight data before, you'll find it at the top of the screen in orange. Dobrze czuje sie tylko wiosna i latem chociaz nie w kazdy dzien, bo jak sa nagle zmiany pogodowe to powraca ten syf. Since the passage of the HITECH Act and healthcare providers' subsequent implementations of EHRs and other modern health IT systems, HIPAA has increasingly governed electronically stored patient data because providers transitioned PHI from paper to electronic formats.
https://www.ketodietoffers.com/keto-lit-bhb-reviews/
Garcinia Market: Oznaczaloby to, ze skoro ludzie sa nieplodni, to znaczy, ze maja na tyle wadliwe geny, ze nie powinni sie rozmnazac (a przynajmniej czesc z nich).High blood glucose levels make people feel tired and generally unwell and can lead to dehydration and poor concentration. Tylko od 1 do 5% (ciezko ustalic jednoznacznie) zgwalconych kobiet zachodzi w ciaze, gdzie ulamek tej liczby decyduje sie na aborcje. A 2012 study found that drinking about a cup of pomegranate juice per day reduced CRP and interleukin-6 levels (markers for inflammation) in patients with type 2 diabetes. Pomaganie innym nawet gdy jest sie obrazanym. The Centers for Disease Control and Prevention estimates somewhere between 11% and 28% of people with diabetes get the recommended podiatric care, a yearly foot exam to check for loss of sensation and blood flow. Podczas tej niesamowitej podniebnej odysei, która - wedlug zalozen - ma trwac blisko pól roku, samolot pokona az 35 tysiecy kilometrów. The muscles and blood vessels improve in tone, fat weight changes to lean weight, and endurance health benefits that are derived from rebounding exercise are unquestionable. Including plenty of these in the diet can help control both weight and blood pressure, both of which are risk factors for heart disease. Risk factors that can throw a person's health triangle out of balance include lack of exercise, poor eating habits, risky sexual behavior, alcohol and drug use, smoking or chewing tobacco and behavior that leads to injury or another health threat.A study found that a diet rich in fruits reduces the risk of the upper gastrointestinal tract. http://www.garciniamarket.com/
ReplyDeleteI was very pleased to find this site.I wanted to thank you for this great read!! I definitely enjoying every little bit of it and I have you bookmarked to check out new stuff you post.
ReplyDeletescr888 free credit rm10 2019
Wow, what a blog! I mean, you just have so much guts to go ahead and tell it like it is. Youre what blogging needs, an open minded superhero who is not afraid to tell scr888 hack app download it like it is. This is definitely something people need to be up on. Good luck in the future, man
ReplyDeleteHolistic Bliss Keto
ReplyDeleteThey can make a point to improve your family plan a short time later on when your entire body can pursue to these progressions comprising of straightforwardness. Families don't needs to bearing all together much very weight, who is extraordinarily tiring. Cardiovascular accomplished for 20 min's or more at a spectacular stretch, push off a particular measure of calories, and afterward interim instructing is that this best style to finish cardio. We may well talk right around an awful guide to what may potentially go wrongly determined to have naturally developed substances.
http://usahealthdiet.com/holistic-bliss-keto/
we Headhunters in India know precisely where to look for your desired person and existing clients with us know that we are the only the most convenient and straight forward head hunting firm in India and user-friendly and time-effective way to fill a role.
ReplyDeletehttps://www.bangaloresecretary.com/head-hunters-in-India
Head hunters India
You made some good quality points there.rapid slim diet pills I did a search on the topic and found many people will agree with your blog.
ReplyDeleteThere is a lot of info on this blog: very helpful
accomplish 918 Kiss, Online Games, Sports online game malaysia Games and Online breathing Casino Slots Games at One Gold 88 Malaysia. You can locate all the best online games at One Gold 88 enliven Today!. Enjoy the fun next our mobile game! affirmation your summit stirring extra for 918 smooch Malaysia today.
ReplyDeletetime-tested beauty tips and tell you whether or not each is based more on fact than fiction.Top 10 beauty tips
ReplyDeletePlay 918 Kiss, Online Games, Sports Games and Online Live Casino Slots Games at One Gold 88 Malaysia. You can find all free slots with bonus the best online games at One Gold 88 Live Today!. Enjoy the fun with our mobile game! Claim your Top up Bonus for 918 Kiss Malaysia today.
ReplyDeleteThanks for taking the time to scr888 hack Sabah discuss that, I really feel strongly about it and love learning more on that topic. If achievable, as you gain competence, would you mind updating your blog with more information It is highly helpful for me.
ReplyDeleteAt the same time, you can easily implement these six tips to avoid the most common mistakes people make and get the most out of your cosmetics. Lip Liner Tips
ReplyDelete
ReplyDeleteKeto Body Tone is too big to be caught by it. We tended to believe them. You have the opportunity to share Keto Body Tone with someone. How can you discover the desired Keto Body Tone? There are dreams available for you to tackle. This way we can find Keto Body Tone all in one place.
http://www.ketotoneworld.com/keto-body-tone/
Very useful blog! This will really help me. Rapid Slim Keto Diet
ReplyDelete
ReplyDeleteer and self discipline. The only thing you can do is that (as I said earlier in some posts) is you can tweak every weight loss solution to your own ne Ultra Fast Keto Boost
Besides using natural soap to cleanse your body and face with, you may also want to use a good quality eye cream. An eye cream is designed to work around the delicate skin of the eye area and reduce puffiness and wrinkles. FairyMines
ReplyDeleteJust imagine all those amazing treats right on your dining table. I should mention again at this point that buying this cook book is completely optional. Trendy Mumi
ReplyDeleteHey, I am Andrew, living in Austin, Texas as a review writer and editor at many Health and Wellness Store including 5g male reviews, ligandrol results, testo max review & rapid slim reviews! I here share my personal experience and customer's feedback and user results on best Health & beauty products they used! Thanks
ReplyDeleteHello I am so delighted I located your blog, I really located you by mistake, while I was watching on google for something else, Anyways I am here now and could just like to say thank for a tremendous post and a all round entertaining website. Please do keep up the great work.purefit keto testofuel max performer cardarine
ReplyDeleteThis is a very nice page.
ReplyDeletemale extra usa
This is a very nice site.
ReplyDeletemale extra usa
Child-only Georgia health insurance plans are usually bought by parents who have an employer-provided health plan that does not include dependent coverage, or has dependent coverage they just can't afford. USA Fitness Plan
ReplyDeleteDietary Cafe est le meilleur site de santé et de remise en forme pour reconstruire votre poids corporel ainsi que votre condition physique.
ReplyDeletehttps://www.dietarycafe.com/
https://www.dietarycafe.com/vital-keto-avis-fr/
http://wealthcode.over-blog.com/
If you search for "POE Currency" in Google, then MMOAH will rank in the top three. Over the years, they have had extensive experience in selling POE Orbs, and their traders are elite exiles, ensuring smooth communication and fast delivery. The discount on their website is 6% off.They have always had a lot of positive comments, and players can get more knowledge about MMOAH by checking in order to get the most professional service to Buy POE Items. They also guarantee a refund before delivery. More than 90% of orders can be completed in 3 to 10 minutes. If you have any needs or questions, please contact them via 24/7 live chat.
ReplyDeleteNice Information put some more information on your page. Visit Kalakutir Pvt Ltd for School Bus Painting and Van & Trucks Branding Wrap.
ReplyDeleteSchool Bus Painting
graphic designer delhi
ReplyDeletegraphic designers in delhi
freelance graphic designer in delhi
graphic designer in delhi
graphic designer near me
graphic designer
graphic designers near me
freelance graphic designer in delhi ncr
logo designer in delhi
graphic designer in delhi ncr
designer delhi
graphic design in delhi
freelance graphic designer logo
logo design freelance
logo designer in delhi
freelance graphic designers in mumbai
logo designers in delhi
freelance logo designer
freelance graphic designers bangalore
freelance graphic designer logos
graphic designing charges in india
designers in delhi
graphic designer in noida
freelance graphic designer bangalore
graphic designer in pune
logo designer in pune
freelance graphic designer mumbai
freelancer graphic designer
freelance website designer
graphic designers in mumbai
graphic designers india
graphic designers delhi
graphic designers noida
graphic designers gurgaon
graphic designers pune
freelance graphic designer
freelance graphic designers
graphic designer india
logo designers in delhi
logo designer near me
logo design india
logo designers in noida
logo design agency
logo designing agency in gurgaon
list of graphic designers in delhi
graphic designer near me
freelance graphic design
Surya Namaskar can totally change your life master interior
ReplyDeleteThanks for sharing such a great information.. It really helpful to me..I always search to read the quality content and finally i found this in you post. keep it up!
ReplyDeleteOur Service:
Digital marketing Company
SMM Services
PPC Services in Delhi
Website Design & Development Packages
Web Development Packages
Web Development Package
Social Media Management Packages
Social Media Management Services
SEO Services Packages
This is also a very good post which I really enjoyed reading. Buy more views on youtube .
ReplyDeleteGreen Fast Keto
ReplyDeleteOfficial Web:-https://ipsnews.net/business/2021/11/13/green-fast-keto-reviews-usa-reviews-scam-diet-bhb-side-effects-legit-diet/
https://maptia.com/green_fast_keto
https://medium.com/@jondaljek/green-fast-diet-keto-is-a-keto-diet-pill-that-helps-you-burn-for-and-lose-weight-and-is-only-3bc32df44622?postPublishedType=initial
https://green-fast-price.jimdosite.com/
https://green-fast-pills.jimdosite.com/
https://green-fast-buy.jimdosite.com/
https://green-fast-us.jimdosite.com/
https://green-fast-pills-price.jimdosite.com/
https://green-fast-keto-dietary-supplemet.jimdosite.com/
https://green-fast-diet-keto-reviews-1.jimdosite.com/
betmatik
ReplyDeletekralbet
betpark
mobil ödeme bahis
tipobet
slot siteleri
kibris bahis siteleri
poker siteleri
bonus veren siteler
R2NV7Z
تنظيف وشفط بيارات
ReplyDeleterd4Ljm3caX