home about contact blogs i love featured linky parties
Showing posts with label gifts. Show all posts

Monday, January 16, 2012

55 Years of Memories

My mom's birthday was last Friday and it was a big one- 55!!  I knew I wanted to do something special. One day I was browsing Pinterest and saw this idea I knew I needed to do it. Collecting memories from all her family and friends and creating "55 Years of Memories" for her. I called my sisters right away and told them we HAD to do this.
This was not going to be easy, especially since we just decided to do this about a month before, but I was determined! My sister gave me my moms email password and I went in and copied her contact list. We also sent it out to friends of hers on Facebook as well as our friends.

{Here is the email I sent: *I used the email from the link where I originally saw this idea and just changed it to fit my needs*

Hi Everyone!
If you're receiving this email, you probably know that our mom, Phyllis, is turning 55 next month (much as she would hate us to be reminding everyone, I'm sure.) To celebrate her birthday, we'd like to put together a little surprise to let her know that her nearest and dearest are thinking of her. We're going to try and create "55 Years of Memories" by filling 55 envelopes with a memory her friends and family have of her.
And this is where you come in!
If you have a spare moment in the next few days, we would be so grateful if you'd jot down a favorite memory you have of our mom and put it in the mail or email it to us. It doesn't have to be anything fancy -- you can just write it down on a piece of paper and sign your name. You can mention anything you like -- although the more nostalgic the better! Please absolutely feel free to send more than one memory (in fact, we welcome it -- we've got 55 envelopes to fill!), but make sure you write them on different pieces of paper (and sign your name to each) so we can split them up.

Thank you so, so, so much for participating -- we know everyone is busy with their own lives, especially this time of year, and we do appreciate you taking a few minutes to do this; it will be so worth it when she reads all the memories people have of her! (Please don't forget to keep it a surprise until then, though!)

We only have a month to get this all together, so if you could please send something out as soon as possible we would really really appreciate it! We know how much this would mean to our mom and really hope we can get 55 memories from her friends and family!

Also, if you know someone else who might have a memory to share, we encourage you to pass them on to them! We only had them email addresses from her contact list, so we may be missing people with special memories! So please pass this on to anyone who might have a great memory of our mom! The more memories the better!!

Thank you so much again!!

Melissa, Kelly and Stacey

*I also included our contact info at the bottom of the email}

I was a little nervous since we sent this in the middle of December and that is usually the busiest time of the year for most people, but not long after I hit send the memories came pouring in!

I think I enjoyed this as much as my mom. I loved reading all the wonderful things people had to say about my mom! {And I also learned some of her friends have very dirty minds... just sayin!}

In the end we got 55 memories as well as pictures. My uncle sent us a ton of pictures of my mom as a little girl! So fun looking through them all!

Here are the envelopes- all numbered 1-55. I cut the numbers on my Cricut and just glued them on.

Uploaded from the Photobucket iPhone App

My sister typed up all the memories that were emailed to us and I did a decorative punch on all the corners. We also got some hand written memories that we just put right into an envelope! This is my 3 year olds memory :)

Uploaded from the Photobucket iPhone App

I found this suitcase {at Michaels} and thought it was perfect. We were 'travelling' through the years with these memories, so I thought it was the perfect thing to hold them all!

Uploaded from the Photobucket iPhone App

Once we stuffed all the envelopes with each memory, I tied them up with a little twine

Uploaded from the Photobucket iPhone App

And all the pictures were added to a photo album {That picture on the top right is my mom taking her first steps! Pretty cool huh?!}

Uploaded from the Photobucket iPhone App

We put both the memories and the pictures in the suitcase and it was a perfect fit!

Uploaded from the Photobucket iPhone App

I made this 'luggage' tag with a quote my sister found I cut the tag on my Cricut and then used stickers to decorate it.

Uploaded from the Photobucket iPhone App

And here it is all ready to be given to the birthday girl!

Uploaded from the Photobucket iPhone App


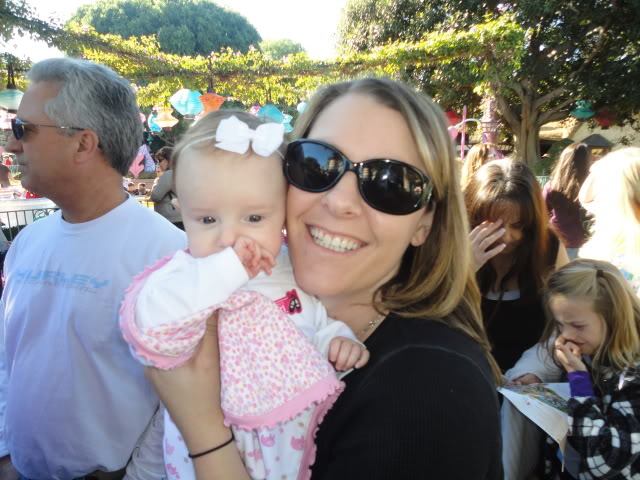
And here are some pictures of her opening it. There were a lot of tears as well as a lot of laughter! I think she was totally surprised we put this together and I really think she will cherish this gift for years to come! {that is my mom and dad and my two cuties!}

Uploaded from the Photobucket iPhone App

Uploaded from the Photobucket iPhone App

Uploaded from the Photobucket iPhone App

Uploaded from the Photobucket iPhone App

Uploaded from the Photobucket iPhone App

Uploaded from the Photobucket iPhone App

Uploaded from the Photobucket iPhone App

Uploaded from the Photobucket iPhone App

Uploaded from the Photobucket iPhone App

Uploaded from the Photobucket iPhone App

Uploaded from the Photobucket iPhone App

Uploaded from the Photobucket iPhone App

Uploaded from the Photobucket iPhone App

Uploaded from the Photobucket iPhone App


If you have the chance to put this gift together for someone, I say go for it! It took a little bit of effort and bugging people to get the memories back, but in the end it was all worth it. I know my mom is going to cherish this gift forever!!!

Monday, June 20, 2011

Tutorial- Hand Painted Wine Glasses- Guest Post on Sweet Peas and Bumblebees

Hey everyone!

 I am sharing the post I did on Sweet Peas and Bumblebees last week in cased you missed it!
Today I am going to show you how to do something that sounds very intimidating but really, its a piece of cake!

Hand Painted Wine Glasses

And now you are thinking, "OK, this chick is nuts". But really, trust me, these are E-A-S-Y. I cannot draw to save my life. No joke. My 3 year old makes fun of my pictures!

I am going to show you how to make some very simple designs that still have the WOW factor!

I have given these to friends for Birthday presents, but I have also given them as wedding shower gifts.  You can package them up in a cute basket with a bottle of wine and you have a gorgeous hand made gift!

So lets get to it!


You will need:

Wine Glasses {hint: get these at the Dollar Store! I get all mine there!}
Gloss Enamel Paint {Michaels, Joanns...}
Paint Brushes


You are going to want to wash and dry your glasses before painting.

Once you have them all ready to go its time to decide what you are going to paint on them!

I chose to do a  polka dot and swirl pattern for two of the glasses, and a simple flower design on the other.


For the polka dots I used blue and white paint. I did different size polka dots and then used the white paint and did little swirls with dots. All of these are SO easy and take no skill {which is what I need when it comes to painting! HA!} but they look so cute!


I also did little dots down the stem and along the base


See- how easy was that?!


Now on to the flower one, which I admit does sound intimidating. But remember, I can't draw, so this has to be easy!

Take your brush- I like to use a smaller one with a little bit of a pointy tip {see, I don't even know proper terms, so I am obviously NOT an artist!}


Then you are going to make a small line that has a slight curve to it on the glass


What does that look like? Looks like half a petal to me!

So now you are just going to make a similar line but with the curve going in the opposite direction starting from the same top point


\


And there you go! You made a petal! 

Now just continue around to make your flower! You can make these with five or six petals, its up to you!

I chose to make mine with six petals


Now it is up to you how many you put on the glass and where you put them!

Get creative!

For this glass I just did six of the same size around the glass. But I have made them before with one huge flower on one side and 3 small ones on the other.... the options are endless!


I also decided they were kind of plain with just the flowers, so I added some white polka dots around the glass.


And also added a white dot to the center of each flower


Then for the base I painted a flower with the same method above but with just five petals


And again I added a white dot to the center and some polka dots around the edge


And that's it!


 For this set I was going with the Red White and Blue color scheme since it is getting close to the 4th of July.  You can paint all the glasses the same color, or each one a totally different color. I have done it all and they always look great. And people LOVE getting these. {Especially people like me because, um.... I tend to break a lot of glasses and I am always in need for more!}

** I forgot to say in my original post, that once you are done painting you need to follow the directions on the back of the paint bottle on how to set the paint. Most you have to let them dry for 24 hours and then bake them for 20 minutes or so to set the paint. The directions are right on the back of the bottle though so just do what they say :)

Don't let the "hand painted" scare you off! I promise, anyone can do these!  If you think the flowers would be too hard, make a set with all polka dots to start! 

Now, go get some paint and wine glasses and have fun!


Monday, June 6, 2011

Personalized Wood Plaque Bow Holders

Its Monday, how did that happen?!?

Like always, the weekends go by way too fast!

My weekend was spent making some custom bow holders a friend ordered!

{I have posted about this type of bow holder before HERE and HERE}

I LOVE LOVE LOVE how this one turned out. Seriously, L.O.V.E.  The picture does not do it justice! {probably due to my sucky lack of photography skills! Shhh}


The paper is so pretty and glittery and just amazing. I loved it so much I went out and bought the store out of this design {and this was the pricey paper- $1.99 a sheet! But seriously, so cute it is worth it!}


See- you can *kinda* see the glitter in this picture


And then of course the matching hanging ribbons to clip all those cute bows on!


This order was for twins, but she didn't want them matchy-matchy.  The second one she wanted in the colors of pink and cream with some green.


I think I hit her color request right on the head! This is just so sweet!!


I also made a bunch of bows to go with these holders! 

I hope they like them!!!

** I will be adding both of these holders to my Etsy store soon! {custom made with your name of course!} If you would like one make sure to check it out! {you can always contact me through here as well if you would like one!}


So how did you spend your weekend? 


HERE is where I link up!

Thursday, March 10, 2011

Crochet Hat

My Nana taught me to crochet when I was a little girl, and I made a few things now and then but never actually from a pattern.

{Crochet patterns scared me.}

I just never got the hang of how to read them.

Until last year. When I was out on maternity leave I decided to purchase some patterns and go for it! (Before, I would watch a you tube video and write down what the person was doing in my own 'language'.)

And to my surprise working from a pattern was much easier than I thought it would be! 

One of my favorite hats I have made for my daughter is from a pattern I purchased from Speckled Frog Crochet on Etsy.

I love the big flower! SO CUTE! And I always get a ton of compliments on this hat and people are shocked when I say I made it myself! It is a gorgeous hat!


Photobucket

Photobucket

I love the detail of the white ribbon wrapped around the bottom


Photobucket

See how cute it is on?!?


Photobucket

Photobucket

Photobucket

I have also made one with a purple flower as a gift for a friend's daughter!


Photobucket

So my advice- try a pattern if you haven't already! They seem scary at first, but are so easy to read once you get the basic abbreviations down!


LinkWithin

Related Posts Plugin for WordPress, Blogger...